用deepseek,自动编写了基于libretro.py的nes模拟器
1. 背景介绍
需求
- 环境配置简单
- 支持新版本python
- 能输入按键,输出运行截屏
- 简单!!稳定!!现成的包简单调用。
现在的问题
现在强化学习使用的包是openAI的gym-super-mario-bros ,配置过这个环境的大概知道,这个环境各种依赖非常吊诡。
笔者找到了一个python包 libretro.py 0.6.0。25年初跟新的最后一个版本,相对来说已经是比较不错的了,而且对其他包的依赖不是很多。
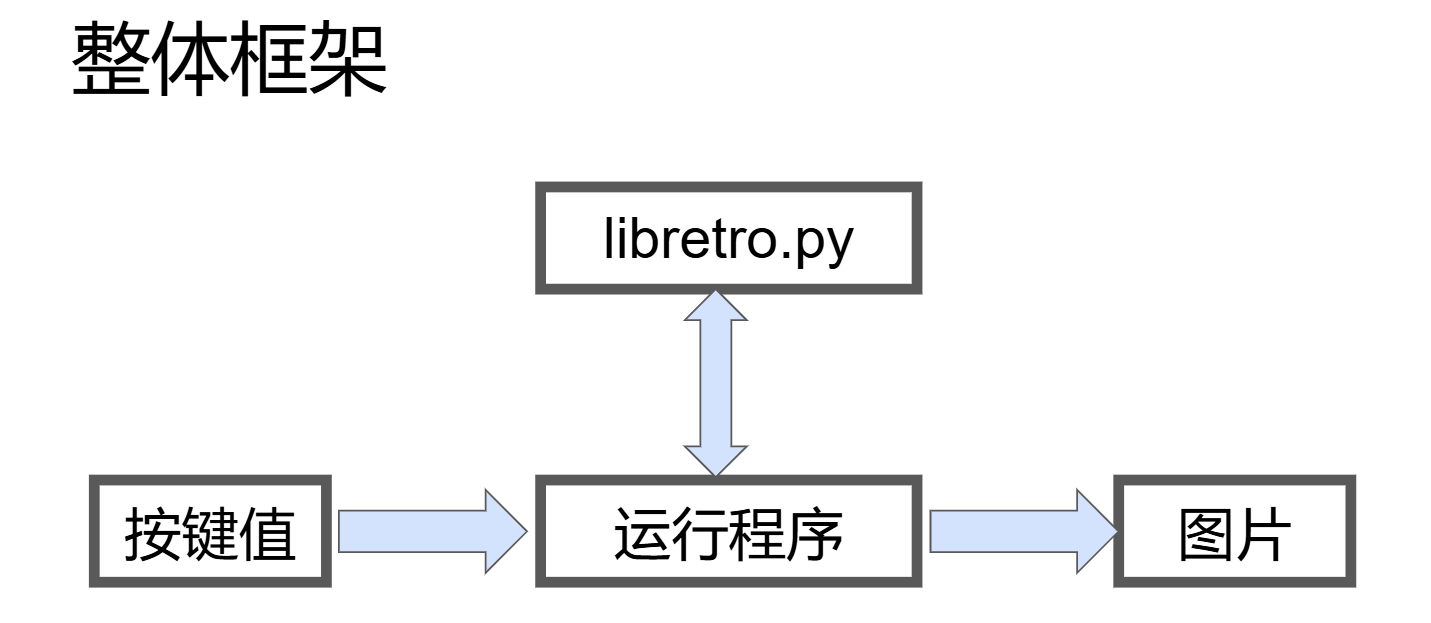
笔者大概设计的软件交互逻辑
需要安装的python 包
pip install libretro.py
pip install opencv-python
pip install pynput
pip install numpy应为笔者不善于python,所以代码基本上都是deepseek生成。
与Deepseek的聊天链接:https://chat.deepseek.com/share/r2fb6m7xxnf3kurd07
资料& 代码: 通过网盘分享的文件:NES环境 链接: https://pan.baidu.com/s/1P7Esr16hX5UjXkUU35TRAw?pwd=d74e 提取码: d74e
2. 对话过程
2.1 最开始的输入
这个代码是 libretro的团队做的一个python的接口
输入有两个部分:
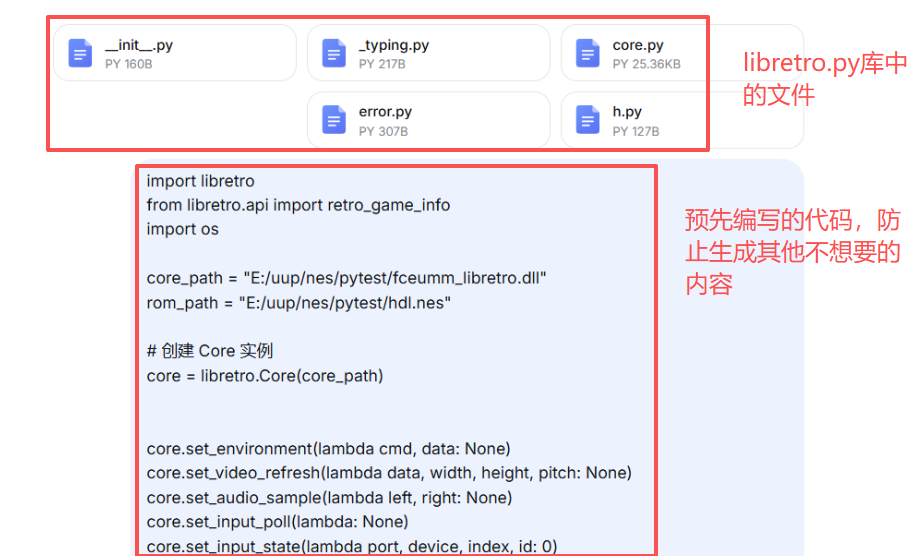
- 附件,是libretro,这个库中的python代码,对比发现不上传参考附件,尝试多次,无法成功生成代码
- 输入的代码也是AI生成的,如果没有输入代码,输出结果容易偏移。有个代码作为开始,会有一个引导的作用
下图看出,代码会个出一些调试相关的内容,类似于我们打断点,debug。 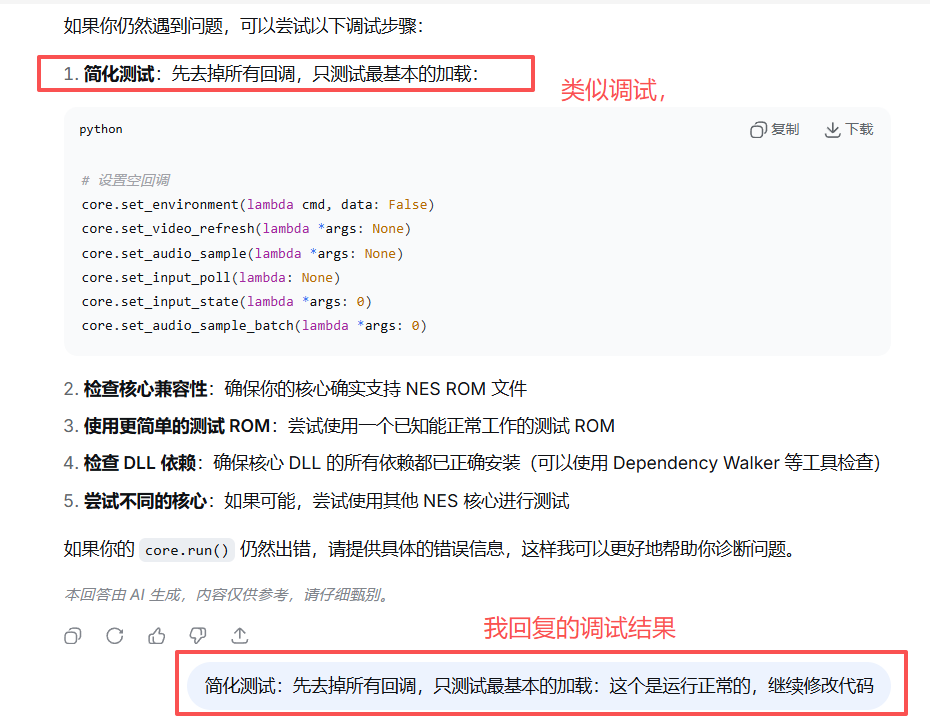
在成功运行后,第一次回答它尝试去调用pygame,但是显示不正常,所以又发送了一次指令。指定使用opencv,可能opencv的兼容性好?这次正常显示了。 还有精简代码,代码太长似乎也会影响性能,而且短了也方便我去读。
 这个位置企图去生成一个,按键输入到模拟器中的功能。但生成多次,依旧不太理想。多按键按下的效果没有实现

这里给了参考,代码功能就无痛实现了。 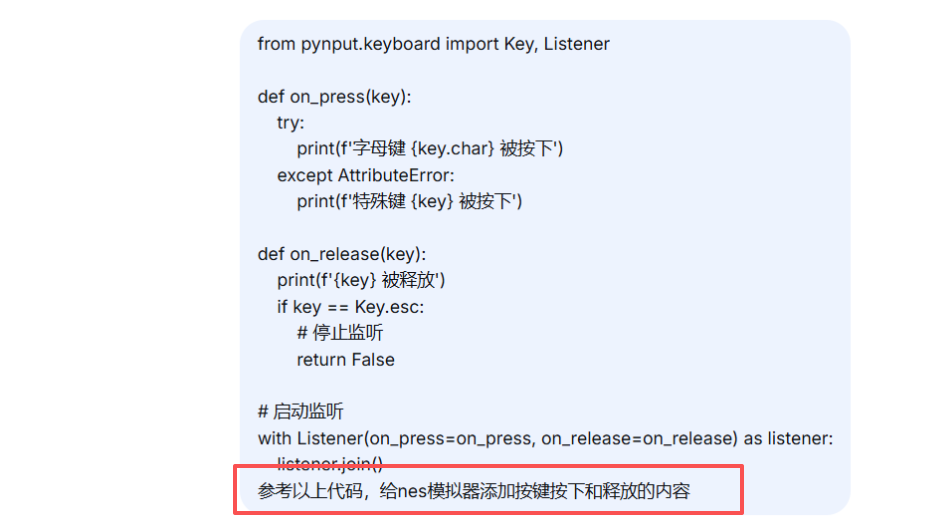
代码1
代码1实现了功能,但是键盘输入,opencv显示,这两个和nes模拟器的核心代码是写在一起的,不方便后面的调用
代码1
# 2026年1月5日16:16:15
# 优化了颜色显示
#优化了乱码显示


import libretro
from libretro.api import retro_game_info
import os
import cv2
import numpy as np
import time
from ctypes import cast, POINTER, c_uint8, c_bool
from pynput import keyboard

core_path = "E:/uup/nes/pytest/fceumm_libretro.dll"
rom_path = "E:/uup/nes/pytest/hdl.nes"

class RetroEmulator:
    def __init__(self, core_path, rom_path):
        self.core_path = core_path
        self.rom_path = rom_path
        self.core = None
        self.frame_count = 0
        self.video_frame = None
        self.running = False

        # FPS计算相关
        self.fps = 0
        self.last_fps_time = time.time()
        self.last_fps_frame_count = 0

        # 控制器状态
        self.controller_state = {
            'UP': False, 'DOWN': False, 'LEFT': False, 'RIGHT': False,
            'A': False, 'B': False, 'START': False, 'SELECT': False,
        }

        # pynput键到游戏按键的映射
        self.key_mapping = {
            # 方向键
            keyboard.Key.up: 'UP',
            keyboard.Key.down: 'DOWN',
            keyboard.Key.left: 'LEFT',
            keyboard.Key.right: 'RIGHT',

            # 字母键
            'w': 'UP', 'W': 'UP',
            's': 'DOWN', 'S': 'DOWN',
            'a': 'LEFT', 'A': 'LEFT',
            'd': 'RIGHT', 'D': 'RIGHT',
            'j': 'A', 'J': 'A',
            'k': 'B', 'K': 'B',

            # 功能键
            keyboard.Key.enter: 'START',
            keyboard.Key.space: 'SELECT',
        }

        # 键盘监听器
        self.keyboard_listener = None

    def calculate_fps(self):
        """计算每秒帧数(FPS)"""
        current_time = time.time()
        time_diff = current_time - self.last_fps_time

        # 每0.5秒更新一次FPS,避免数字跳动太快
        if time_diff >= 0.5:
            frames_diff = self.frame_count - self.last_fps_frame_count
            self.fps = frames_diff / time_diff
            self.last_fps_time = current_time
            self.last_fps_frame_count = self.frame_count

        return self.fps

    def convert_video_data(self, data_ptr, width, height, pitch):
        """转换视频数据为OpenCV可显示的格式 - 使用BGRA格式"""
        try:
            # 将C指针转换为numpy数组
            arr = np.frombuffer(
                (c_uint8 * (height * pitch)).from_address(data_ptr),
                dtype=np.uint8
            ).reshape((height, pitch))

            # 假设是32位格式(BGRA)
            if pitch == width * 4:
                # BGRA -> BGR
                bgra = arr[:, :width*4].reshape((height, width, 4))
                bgr = cv2.cvtColor(bgra, cv2.COLOR_BGRA2BGR)
                return bgr
            # 如果是其他格式(如RGB24)
            elif pitch == width * 3:
                # RGB -> BGR
                rgb = arr[:, :width*3].reshape((height, width, 3))
                return cv2.cvtColor(rgb, cv2.COLOR_RGB2BGR)

            return None

        except Exception as e:
            print(f"视频数据转换错误: {e}")
            return None

    def on_press(self, key):
        """按键按下时的回调函数"""
        try:
            key_char = key.char
        except AttributeError:
            key_char = None

        # 检查按键映射
        if key in self.key_mapping:
            button = self.key_mapping[key]
            self.controller_state[button] = True
        elif key_char and key_char in self.key_mapping:
            button = self.key_mapping[key_char]
            self.controller_state[button] = True

    def on_release(self, key):
        """按键释放时的回调函数"""
        try:
            key_char = key.char
        except AttributeError:
            key_char = None

        # 检查按键映射
        if key in self.key_mapping:
            button = self.key_mapping[key]
            self.controller_state[button] = False
        elif key_char and key_char in self.key_mapping:
            button = self.key_mapping[key_char]
            self.controller_state[button] = False

        # ESC键退出
        if key == keyboard.Key.esc:
            self.running = False
            return False

    def start_keyboard_listener(self):
        """启动键盘监听器"""
        print("启动键盘监听器...")
        print("控制键: WASD/方向键(方向), J(A), K(B), Enter(Start), Space(Select), ESC(退出)")

        # 创建监听器
        self.keyboard_listener = keyboard.Listener(
            on_press=self.on_press,
            on_release=self.on_release
        )

        # 启动监听器(非阻塞)
        self.keyboard_listener.start()

    def stop_keyboard_listener(self):
        """停止键盘监听器"""
        if self.keyboard_listener:
            self.keyboard_listener.stop()
            self.keyboard_listener = None

    def init_core(self):
        """初始化核心"""
        print(f"加载核心: {self.core_path}")
        self.core = libretro.Core(self.core_path)

        # 环境回调
        def env_callback(cmd, data):
            return False

        # 视频回调
        def video_callback(data, width, height, pitch):
            try:
                self.frame_count += 1
                if data and width > 0 and height > 0:
                    # 转换视频数据(使用BGRA格式)
                    bgr_frame = self.convert_video_data(data, width, height, pitch)
                    if bgr_frame is not None:
                        self.video_frame = bgr_frame
            except Exception as e:
                print(f"视频回调错误: {e}")

        # 音频回调(简化)
        def audio_callback(left, right):
            pass

        def audio_batch_callback(data, frames):
            return frames

        # 输入回调
        def input_poll():
            pass

        def input_state(port, device, index, id):
            """输入状态回调 - 返回按键状态给libretro核心"""
            if port == 0 and device == 1:
                # libretro标准按键ID映射
                button_map = {
                    0: 'B', 1: 'Y', 2: 'SELECT', 3: 'START',
                    4: 'UP', 5: 'DOWN', 6: 'LEFT', 7: 'RIGHT',
                    8: 'A', 9: 'X', 10: 'L', 11: 'R',
                }

                button_name = button_map.get(id)
                if button_name and button_name in self.controller_state:
                    return 1 if self.controller_state[button_name] else 0

            return 0

        # 设置所有回调函数
        self.core.set_environment(env_callback)
        self.core.set_video_refresh(video_callback)
        self.core.set_audio_sample(audio_callback)
        self.core.set_audio_sample_batch(audio_batch_callback)
        self.core.set_input_poll(input_poll)
        self.core.set_input_state(input_state)

        # 初始化核心
        self.core.init()
        return True

    def load_game(self):
        """加载游戏ROM"""
        if not os.path.exists(self.rom_path):
            print(f"错误: ROM文件不存在: {self.rom_path}")
            return False

        # 读取ROM文件
        with open(self.rom_path, 'rb') as f:
            rom_data = f.read()

        print(f"ROM大小: {len(rom_data)} 字节")

        # 创建游戏信息结构
        game_info = retro_game_info()
        game_info.path = self.rom_path.encode('utf-8')
        game_info.data = None
        game_info.size = 0
        game_info.meta = None

        # 加载游戏
        success = self.core.load_game(game_info)
        if success:
            print("游戏加载成功!")
            return True
        else:
            print("游戏加载失败!")
            return False

    def run(self):
        """运行模拟器"""
        print("运行模拟器...")
        self.running = True

        # 启动键盘监听器
        self.start_keyboard_listener()

        # 创建OpenCV窗口
        cv2.namedWindow('NES (ESC exit)', cv2.WINDOW_NORMAL)

        try:
            while self.running:
                # 运行一帧
                self.core.run()

                # 显示视频帧
                if self.video_frame is not None:
                    # 在画面上显示按键状态
                    display_frame = self.video_frame.copy()

                    # 显示当前按下的键
                    active_keys = [k for k, v in self.controller_state.items() if v]
                    if active_keys:
                        status = f"key: {', '.join(active_keys)}"
                        cv2.putText(display_frame, status, (10, 20),
                                   cv2.FONT_HERSHEY_SIMPLEX, 0.5, (0, 255, 0), 1)

                    # 计算并显示FPS
                    current_fps = self.calculate_fps()
                    fps_text = f"FPS: {current_fps:.1f}"
                    cv2.putText(display_frame, fps_text,
                               (10, 40), cv2.FONT_HERSHEY_SIMPLEX, 0.5, (0, 255, 255), 1)

                    # 显示总帧数
                    # cv2.putText(display_frame, f"总帧数: {self.frame_count}",
                    #            (10, 60), cv2.FONT_HERSHEY_SIMPLEX, 0.5, (255, 200, 100), 1)

                    # 显示游戏
                    cv2.imshow('NES (ESC exit)', display_frame)

                # 检查OpenCV窗口是否关闭
                if cv2.waitKey(1) & 0xFF == 27:  # ESC键
                    self.running = False
                    break

        except Exception as e:
            print(f"运行错误: {e}")

        finally:
            # 清理资源
            cv2.destroyAllWindows()
            self.stop_keyboard_listener()

    def shutdown(self):
        """关闭模拟器"""
        print("关闭模拟器...")
        self.running = False

        if self.core:
            try:
                self.core.unload_game()
                self.core.deinit()
                print("核心已关闭")
            except Exception as e:
                print(f"关闭核心时出错: {e}")

def main():
    """主函数"""
    print("=== NES模拟器 (BGRA颜色格式) ===")

    # 创建模拟器实例
    emu = RetroEmulator(core_path, rom_path)

    try:
        # 初始化核心
        if not emu.init_core():
            print("初始化核心失败!")
            return

        # 加载游戏
        if not emu.load_game():
            print("加载游戏失败!")
            return

        # 运行模拟器
        emu.run()

    except KeyboardInterrupt:
        print("\n用户中断")
    except Exception as e:
        print(f"模拟器错误: {e}")
        import traceback
        traceback.print_exc()
    finally:
        # 关闭模拟器
        emu.shutdown()

if __name__ == "__main__":
main()代码2
按键功能,四个方向键+z+x 控制实现 显示核心与游戏核心分离,可以读取到现在的游戏界面 按键输入键盘更新状态,按键与nes核心也分离出来了
全部运行的时候莫名会卡住,感觉像是conda的问题
代码2
import libretro
from libretro.api import retro_game_info
import os
import cv2
import numpy as np
from ctypes import c_uint8
from pynput.keyboard import Key, Listener
import threading
import time

core_path = "E:/uup/nes/pytest/fceumm_libretro.dll"
rom_path = "E:/uup/nes/pytest/super-mario-bros.nes"

class RetroEmulator:
    def __init__(self, core_path, rom_path):
        self.core_path = core_path
        self.rom_path = rom_path
        self.core = None
        self.frame_count = 0
        self.video_frame = None
        self.running = False

        # 控制器状态
        self.controller_state = {
            'UP': False, 'DOWN': False, 'LEFT': False, 'RIGHT': False,
            'A': False, 'B': False, 'START': False, 'SELECT': False,
        }

        # 键盘到NES按键映射
        self.key_mapping = {
            'up': 'UP',
            'down': 'DOWN',
            'left': 'LEFT',
            'right': 'RIGHT',
            'z': 'A',           # Z键映射为A
            'x': 'B',           # X键映射为B
            'enter': 'START',   # Enter键映射为START
            'shift': 'SELECT',  # Shift键映射为SELECT
        }

    def init_core(self):
        """初始化核心"""
        self.core = libretro.Core(self.core_path)

        # 设置回调
        def env_callback(cmd, data):
            return False

        def video_callback(data, width, height, pitch):
            try:
                self.frame_count += 1
                if data and width > 0 and height > 0:
                    arr = np.frombuffer((c_uint8 * (height * pitch)).from_address(data),
                                        dtype=np.uint8).reshape((height, pitch))
                    if pitch == width * 4:
                        rgb = arr[:, :width*4].reshape((height, width, 4))
                        self.video_frame = rgb
            except:
                pass

        def audio_callback(left, right):
            pass

        def audio_batch_callback(data, frames):
            return frames

        def input_poll():
            pass

        def input_state(port, device, index, id):
            if port == 0 and device == 1:
                button_map = {0: 'B', 1: 'Y', 2: 'SELECT', 3: 'START',
                              4: 'UP', 5: 'DOWN', 6: 'LEFT', 7: 'RIGHT',
                              8: 'A', 9: 'X'}
                button_name = button_map.get(id)
                if button_name in self.controller_state:
                    return 1 if self.controller_state[button_name] else 0
            return 0

        self.core.set_environment(env_callback)
        self.core.set_video_refresh(video_callback)
        self.core.set_audio_sample(audio_callback)
        self.core.set_audio_sample_batch(audio_batch_callback)
        self.core.set_input_poll(input_poll)
        self.core.set_input_state(input_state)

        self.core.init()
        return True

    def load_game(self):
        """加载游戏ROM"""
        if not os.path.exists(self.rom_path):
            return False

        with open(self.rom_path, 'rb') as f:
            rom_data = f.read()

        game_info = retro_game_info()
        game_info.path = self.rom_path.encode('utf-8')
        game_info.data = None
        game_info.size = 0
        game_info.meta = None

        return self.core.load_game(game_info)

    def run(self):
        """运行模拟器一帧并返回当前帧图像"""
        # 运行一帧
        if self.core:
            self.core.run()

        # 返回当前视频帧
        return self.video_frame

    def update_controller_state(self, controller_state_dict):
        """更新控制器状态,接收完整的控制器状态字典"""
        self.controller_state = controller_state_dict.copy()

    def shutdown(self):
        """关闭模拟器"""
        if self.core:
            try:
                self.core.unload_game()
                self.core.deinit()
            except:
                pass


class KeyboardController:
    def __init__(self, emulator):
        self.emulator = emulator
        self.controller_state = {
            'UP': False, 'DOWN': False, 'LEFT': False, 'RIGHT': False,
            'A': False, 'B': False, 'START': False, 'SELECT': False,
        }
        self.listener = None
        self.running = False

        # pynput按键到字符串的映射
        self.pynput_key_mapping = {
            Key.up: 'up',
            Key.down: 'down',
            Key.left: 'left',
            Key.right: 'right',
            Key.enter: 'enter',
            Key.shift: 'shift',
        }

        # 字母键的映射
        for char in 'abcdefghijklmnopqrstuvwxyz':
            self.pynput_key_mapping[KeyCode.from_char(char)] = char

    def on_press(self, key):
        """按键按下事件处理"""
        try:
            # 获取按键名称
            key_name = self._get_key_name(key)

            # 如果按键在映射表中,更新控制器状态
            if key_name in self.emulator.key_mapping:
                button_name = self.emulator.key_mapping[key_name]
                self.controller_state[button_name] = True

                # 更新模拟器的控制器状态
                self.emulator.update_controller_state(self.controller_state)

                print(f"按键按下: {key_name} -> {button_name}")

        except Exception as e:
            print(f"按键处理错误: {e}")

    def on_release(self, key):
        """按键释放事件处理"""
        try:
            # 获取按键名称
            key_name = self._get_key_name(key)

            # 如果按键在映射表中,更新控制器状态
            if key_name in self.emulator.key_mapping:
                button_name = self.emulator.key_mapping[key_name]
                self.controller_state[button_name] = False

                # 更新模拟器的控制器状态
                self.emulator.update_controller_state(self.controller_state)

                print(f"按键释放: {key_name} -> {button_name}")

            # 如果是ESC键,停止监听
            if key == Key.esc:
                self.running = False
                return False

        except Exception as e:
            print(f"按键处理错误: {e}")

    def _get_key_name(self, key):
        """从pynput的Key对象获取按键名称"""
        if key in self.pynput_key_mapping:
            return self.pynput_key_mapping[key]

        try:
            # 尝试获取字符
            if hasattr(key, 'char'):
                return key.char
        except:
            pass

        return str(key)

    def start(self):
        """启动键盘监听"""
        self.running = True

        # 创建监听器
        self.listener = Listener(
            on_press=self.on_press,
            on_release=self.on_release
        )

        # 启动监听线程
        self.listener.start()
        print("键盘监听已启动,按ESC键退出")

    def stop(self):
        """停止键盘监听"""
        if self.listener:
            self.listener.stop()
            self.listener = None
        self.running = False
        print("键盘监听已停止")


# 导入KeyCode
from pynput.keyboard import KeyCode


def main():
    # 创建模拟器实例
    emu = RetroEmulator(core_path, rom_path)

    time.sleep(0.01)
    # 初始化模拟器
    if not emu.init_core():
        print("初始化模拟器核心失败")
        return

    # 加载游戏ROM
    if not emu.load_game():
        print("加载游戏ROM失败")
        return

    # 创建键盘控制器
    keyboard_controller = KeyboardController(emu)

    # 启动键盘监听
    keyboard_controller.start()

    # 创建显示窗口
    cv2.namedWindow('NES Emulator', cv2.WINDOW_NORMAL)

    frame_count = 0
    save_interval = 100  # 每100帧保存一张图片

    print("模拟器已启动,使用方向键和Z/X/Enter/Shift键控制")
    print("按ESC键退出模拟器")

    try:
        # 主循环
        while keyboard_controller.running:
            # 运行一帧并获取图片
            frame = emu.run()

            # 显示视频帧
            if frame is not None:
                cv2.imshow('NES Emulator', frame)
                frame_count += 1

                # 定期保存图片,覆盖之前的
                if frame_count % save_interval == 0:
                    filename = f"output.jpg"
                    cv2.imwrite(filename, frame)

            # 处理OpenCV窗口事件(保持窗口响应)
            key = cv2.waitKey(1) & 0xFF
            if key == 27:  # ESC键
                break

            # 稍微延迟以控制帧率
            time.sleep(0.01)

    except KeyboardInterrupt:
        print("程序被中断")

    finally:
        # 清理资源
        keyboard_controller.stop()
        cv2.destroyAllWindows()
        emu.shutdown()
        print("模拟器已关闭")


if __name__ == "__main__":
    main()